Wight Mistress’s ‘Poo’ Tank


First and foremost (and one is always taught never to open a presentation with an apology) please accept my apologies for not writing this one up a long time ago.
Anyway.....
We decided to fit a holding tank in around 2010 for our French waterways expedition and Mediterranean cruises planned to start within a few years.
Actually, the French waterways bit happened earlier than we expected but we did have the holding tank system - not that it was ever used in anger in France. We discovered in 2011 that there were precious few places with pump out facilities and even though we wanted to use the system it was almost impossible - even in Paris. It could, perhaps, be different as I write this in 2017 - the last expedition into the waterways for us was in 2014. An American friend and his wife and grand daughter were visiting Paris and we ‘happened’ to be at a loose end in Honfleur (like you are of course) so we picked the right window and did the Seine dash to Rouen, spending the next 3 months enjoying the waterways in a huge circle as far south as Auxonne and remasting in Dunkirk. Anyway this is not giving you the story about the holding tank.
We decided to try out a small tank as an experiment, minimising the disruption to the space available. As one knows, a Fisher 34 bathroom is fairly snug so we worked on the space behind our fold out sink. Careful measurement showed we could get a standard rectangular poly tank from Tek Tanks at Alton. They are brilliant and we also used them for our diesel day tank (separate write up on this site.)
Lessons learned from time in the Royal Navy (where I was employed designing and installing systems into ships and submarines for some years) including paying particular attention to AR&M (Availability, Reliability and Maintainability) of systems.
This is particularly important with a poo tank system as one needs to be able to fix it in fairly short order if a defect/blockage arises.)
The whole installation was designed to allow as easy access as possible to all the tank connections. The tank was also mounted leaning very slightly aft, with the discharge hose connecting directly to the heads discharge seacock.
The inlet was connected from the heads to the tank top almost directly above the discharge to allow best flow of ‘stuff’ when the tank is used in normal line up - ie with the discharge open to sea. This means that everything that goes down the loo goes through the holding tank so the tank is well ‘flushed.’ To use the holding tank, simply shut the seacock.
VERY IMPORTANT NOTE ABOUT POO TANKS
I may not have the terminology right but I hope you get the drift.
In a ‘poo’ situation there are two types of ‘gremlins:‘ aerobic and anaerobic.
The aerobic gremlins need air to survive but do not smell. The anaerobic gremlins do not need air, indeed I think they will not survive where there is oxygen, but they smell a bit gross. So, if you want a stink free poo tank, it is essential that your tank has a vent pipe at least the same diameter as the inlet and outlet pipes. Ours has been in service for about 8 or 9 years and it is still stink free, even though we have had two minor blockages.
Anyway.
After stripping the basin unit out and giving the space a good huck out and a scrub, I epoxied a ply shelf in, with some end pieces to hold the tank in place.
The space above the tank was adequate to fit the pump out hose and deck fitting and the flush hose and deck fitting with those pipes straight to the tank top. The heads soil pipe came up over the top of the tank and was fitted with an elbow fitting into the tank top.
The tank volume is 31 litres - not huge but big enough to get you out of trouble. If we ever really need to use it in anger we may consider a bigger tank.
BLOCKAGES
(Touch wood) we have experienced two minor blockages: one when a visitor to the boat decided to use half a roll of loo roll in one sitting, and the other one was perhaps a bit of a build up or a slightly larger than usual ‘production’ .
To mitigate the risk we have a simple rule, same as the one used in the eastern Med and some houses in southern Europe, and that is:
NOTHING GOES DOWN THE LOO UNLESS IT HAS BEEN THROUGH YOU FIRST.
We have a little bin with a nappy bag in it for paper waste and with the perfumed happy bag bin liners, it works very well with no smell.
If you do experience a blockage, use a large soft wood taperedbung with some self vulcanising tape around it at the right diameter. Tap it gently into the vent skin fitting (ours is fitted in the bulwark opening, facing aft) Then proceed to the loo and flush and pump until you build up a little pressure in the tank. The offending pipe resident will then be evicted in the normal manner. If this doesn’t work then the job would get a little yuckier, so following the rule about nothing going down the loo unless it has been through you first, is a good idea.
On to the Project
First thing we had to do was scope out the space we had and decide what we can achieve. The space looked a bit like this:;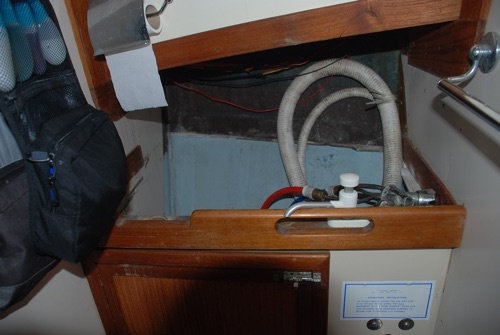
With the sloping deck, curved sides and minimal space, we established that we could fit a rectangular tank. The measurements of the tank were 50x30x25 cm. but what we did next was make a cardboard space model to ensure that it would fit in and be removable should repairs be required. the space model looked like this:

note the pipe fitting markings. These did actually change a bit as the project progressed. From this we came up with a design drawing:

The inlets continued to change a bit.........
Once the size etc was established, we ordered the tank from Tek Tanks at Alton.


The plywood shelf was battened and epoxy bonded to heads bulkhead and hull with a hole cut to fit the discharge gland with space to connect and disconnect by hand. The shelf was slightly canted aft to provide a flow to the discharge gland.
It was interesting marking up the deck for the tank wash and pump out fittings so that the hose connections were completely straight and vertical. The inlet and vent pipes were longer and fitted with elbows to allow flexible coupling for screwing to the tank top.
The prime mover for the toilet is a Henderson MkIV pumping out a Lavac toilet, the vacuum from which draws flush water in from the inlet seacock.

Nothing had to be done to the toilet installation, other than cutting the outlet hose and fitting the tank top connector, then connecting the the tank discharge to the toilet sea cock. For this I used a high quality white armoured rubber hose, simply because it was easier to run and to fit to the tank and hull fixings.
Notes:
3 November 2020. Just updated the poo tank drawing to make measurements all metric and correct some details.